As the leaves change colors and the temperature begins to drop, many are starting to set their sights on preparing their pool for the cool winter ahead.
This task can be daunting, but closing your above-ground pool doesn’t have to be a challenge, and with a few simple steps, you can feel confident you’re ready to head into the winter season.
Closing your above-ground pool properly is essential in keeping it in pristine condition, and will play a valuable role in how it welcomes you back once spring arrives.
Not sure where to start?
No problem! In this guide, we’ll walk you through the process step by step, from gathering the right supplies to preparing the water and laying down your cover.
By the end, you’ll have an expertly closed pool that’ll be a breeze to open next spring!
Read on to get started!
When Should You Close Your Above-Ground Pool?
Before you can start the process of closing your pool, you’ll need to know when you should be closing it.
For many, September or October is the sweet spot for closing their pool, with warmer days often few and far between, however, this can change based on your local climate.
So, how do you know exactly when it’s time to close your pool, and what’s the harm in closing it while it’s still warm?
The easiest way to determine if it’s time to close your pool is by watching the temperature. Ideally, you’ll want to close your pool once temperatures begin to frequently drop below 65℉.
If you close your pool earlier than this, the warmer water of your pool will have a higher chance of developing algae, making it more tedious to open come spring.
By using this temperature as a gauge to guide your planning, you’ll be able to ensure your pool will be protected from frigid temperatures while keeping algae and bacteria growth to a minimum.
The Benefits of Properly Closing Your Above-Ground Pool
Before we dive into the process, let’s explore why closing your pool properly is so important.
Closing your pool is about far more than simply protecting it from the snow and ice; it’s about maximizing its lifespan and reducing the cost of maintenance in the long run.
Let’s explore five reasons why closing your above-ground pool properly is key!
1. Protecting Your Investment
Even though above-ground pools are more affordable than their in-ground counterparts, they’re still a significant investment and should be treated as such.
The last thing you want is a pool that should have lasted you 20 years, requiring simple repairs before you even reach the end of the first decade.
From excess debris, algae, and damage from plummeting temperatures, there are plenty of ways your pool can be damaged when improperly closed.
By taking the time and effort to properly close your pool, you’ll be able to reduce the risk of costly damage occurring and ensure your pool remains in premium condition for years to come!
2. Preventing Damage
Improperly closed pools are highly susceptible to freeze damage, which can result in costly repairs come spring.
Water expands as it freezes, which can lead to cracks, structural damage, or issues with your liner or plumbing without the proper precautions in place.
By following the steps in this guide, you’ll be able to keep freeze damage at bay and re-open your pool with ease when the heat returns.
3. Reduce Spring Maintenance
Once those heat waves begin, the last thing you want to be doing is fighting with your pool to re-open it.
Luckily, with the proper closing routine, opening your pool can be a breeze, getting you into the water and enjoying its refreshing depths sooner.
Better yet, a thorough closing routine will ensure your water requires fewer chemicals to rebalance it once you re-open it, saving you money in the process!
4. Minimizing Algae Growth
When your pool isn’t properly sanitized or balanced prior to closing, there’s a significant risk that algae will begin thriving throughout the long winter.
This can make re-opening your pool a troublesome task, forcing you to combat the algae before you can start the process of sanitizing your water and preparing it for your first swim.
5. Safety
Pool safety should be at the forefront of every pool owner’s mind at all times.
Closing your above-ground pool properly is about more than protecting your pool; it’s also about maximizing the safety of your backyard.
Investing in the right winter pool cover is a must.
What You Need to Close Your Pool
Now, let’s get into the real reason you came to us; closing your above-ground pool!
Before beginning, you’ll need to collect all the necessary equipment to effectively close your pool.
Here’s everything you’ll need before we begin.
Pool Safety Cover
This is a key component of your pool closure.
When selecting your cover, opt for one that stretches above your water’s surface with safety locks.
Pool Chemicals
To make closing your pool even easier, there are various pool closing kits or winterization kits on the market that come with a precise mixture of chemicals to make treating your water effortless.
However, if you’d prefer to add your chemicals with more precision, or want to use up your supply before winter, here are the chemicals you’ll want to include:
- pH increaser
- Alkalinity increaser
- Calcium hardness increaser
- Shock
- Algaecide
- Clarifying enzyme supplement
Pool Vacuum, Brush, and Skimmer
Cleaning your pool before closing will help keep bacteria and algae growth at bay throughout the winter.
Your skimmer, brushes, and vacuum will ensure your water is nice and clean before you seal it up for the season.
A Pool Pillow
A pool pillow is crucial in protecting your spa from damage, supporting the weight of your cover once snow and ice begin accumulating.
These air pillows rest on the surface of your water, directly under your cover, and reduce the pressure a sagging cover would have on the sides of your pool.
DO NOT forgo adding a pool pillow!

Your Step-By-Step Guide For Closing Your Above-Ground Pool
Now that you have everything you need, let’s dive into the process of closing your above-ground pool!
Step 1: Clean and Balance The Pool Water
As mentioned above, the quality of your water before closing your above-ground pool matters, so you’ll want to ensure you treat it with the necessary chemicals beforehand.
This process will help combat algae growth, and reduce scale buildup or corrosion.
Remove Debris
First and foremost, you’ll want to clean your pool’s surface, removing any leaves that may have begun falling into the water.
Brush and Vacuum The Underwater Surfaces
Once the surface is clear, you’ll want to give your pool one last clean.
Using your brush, scrub every underwater surface of your pool, from the walls to the floor, getting into every nook and cranny possible.
After you’ve given it a good scrub, use your vacuum to clear up any debris you lifted from the surface.
Test & Adjust The Water Chemistry
After cleaning your pool, you’ll want to balance the water for the last time. Get an initial reading on your water quality using your pH test strips. Then, use your chemicals to bring everything into the following range:
- pH: 7.4 – 7.6
- Alkalinity: 100 – 150 ppm
- Calcium hardness: 175 – 225 ppm
- Chlorine: 1 – 3 ppm
If you’re using bromine or another type of sanitizer, ensure the sanitizer levels in your water match the range stated in their directions.
Lastly, to keep algae from developing, add some algaecide following the directions on its bottle closely.
Shock The Pool
Your sanitizer will be one of the first elements to slowly break down, so adding a shock treatment will help give it the boost it needs to make it through the winter.
Follow the directions on your bottle of shock closely, matching the dosage with the size of your pool.
Step 2: Lower The Water Levels
Now that your water is in good condition, you can start preparing your pool itself. To start, you’ll want to slightly drain your pool, reducing the water levels to rest just below the skimmer.
This will ensure your skimmer doesn’t get damaged as water freezes throughout the winter months.
During this step, remember not to drain the pool completely. A completely drained above-ground pool can damage your liner, drying it out and significantly diminishing its lifespan.
Step 3: Winterize Pool Equipment
Next up, prepare your pool equipment!
Drain The Lines
First and foremost, you’ll want to completely drain the lines of your pool and remove them.
This serves as a proactive measure to eliminate the potential of your lines being damaged from the water inside them freezing, increasing the pressure inside, and expanding them.
By forgoing this step, you run the risk of reopening your pool and discovering issues and potentially costly repairs.
After you’ve drained and removed your lines, store them somewhere warm and safe, ideally indoors. We recommend storing them alongside your pump and filters so they’re easy to find in the spring.
Disassemble The Pump
Your pump and filters are some other aspects that can be damaged if exposed to freezing water.
To keep them in good working condition for the next swimming season, you’ll want to take them apart and store them in a warm place for the winter.
To disassemble the pump, you’ll want to remove all the drain plugs and hoses, draining the pump and hoses of any lingering water.
Once you’re confident they are free from water, store the pump, drain plugs, and hoses with the lines you previously removed.
When it comes to your filter, you’ll want to closely follow the instructions provided by the manufacturer to ensure you winterize it properly.
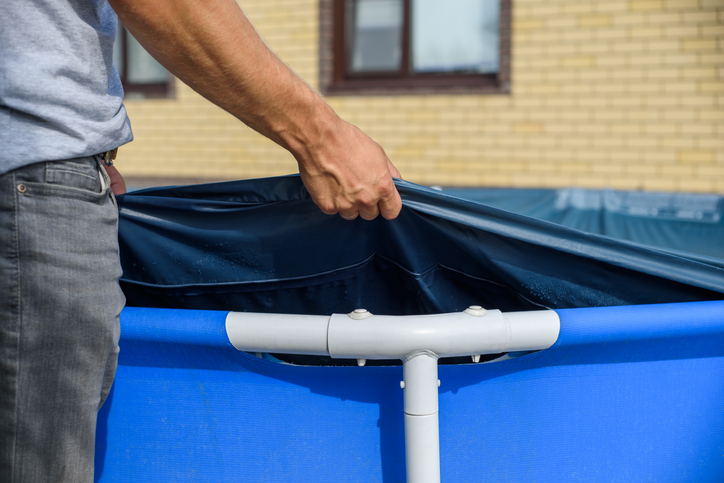
Step 4: Install your Cover
Now comes one of the easiest parts; covering your pool!
Your cover will keep debris from getting into your water throughout the winter, protecting both the water and your pool itself from the harsh winter weather.
But it’s also a significant barrier between your water and any children or small animals, making it a crucial safety feature of your pool.
Before installing your cover, inflate your pool pillow roughly 60% of the way and add it to your water.
Then, spread your cover across the surface of your pool, and secure it with the straps it came with.
Many modern safety covers come with various cover clips to enhance safety. Avoid using things like heavy rocks, or bricks to hold down your cover.
Not only can these items be pulled down into the water as snow gathers on the cover, damaging your liner, but it actually creates additional hazards around your pool’s edge.
Step 5: Clean and Store Your Accessories
Finally, you can clean your pool accessories, deflate those floaties, and store them in your pool shed for next year!
This includes things like your ladder, chlorine dispenser, thermometer, pool noodles, and other toys.
To lift any lingering chemicals that may be on their surface from being in the pool, clean them using an all-purpose cleaner before storing them for the winter.
Above-Ground Pool Closing Services in Green Brook, New Jersey
Not sure you want to take on the challenge of closing your above-ground pool yourself?
No problem! The team of experts at Sun Pools is here to help!
Our knowledgeable team will be glad to visit your home to help with closing your above-ground pool, taking care of every step listed above for you, so you can head into the winter season confident your pool was closed properly.
Contact us, or request service using our convenient online form today.
 by
by